Tech Support
Trout in the Classroom
1.) Equipment Overview
2.) Common Equipment Problems
3.) Tank Maintenance Tips
4.) Instructional Videos & Resources
5.) End-of-Year Clean Up
6.) MSDS PDF's
___________________
1.) Equipment Overview
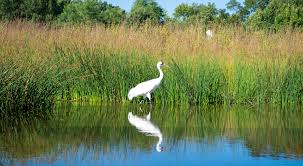
A.) Making the Connection (Aquarium- Natural Habitat)
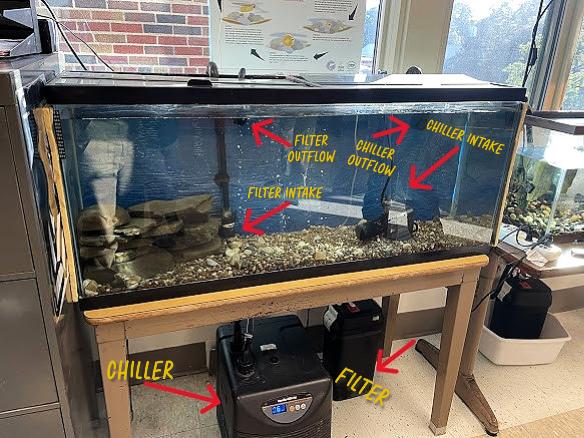
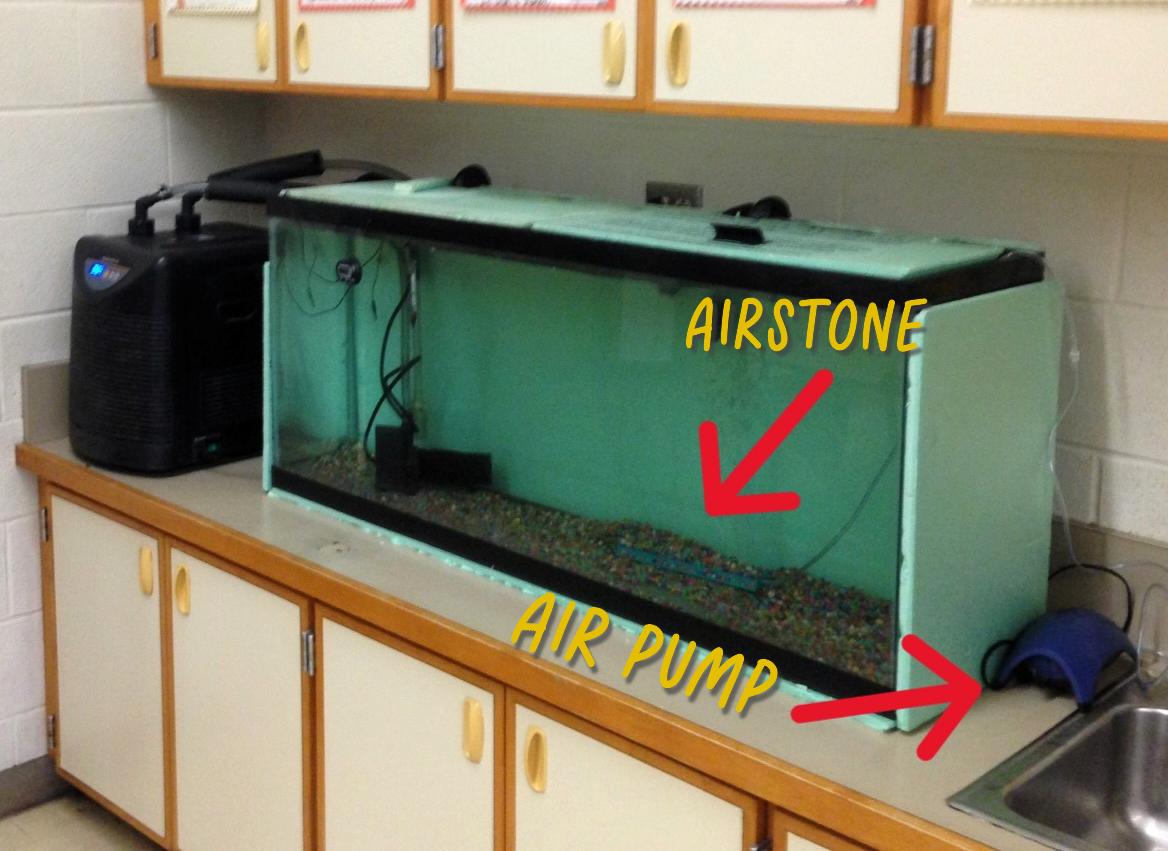
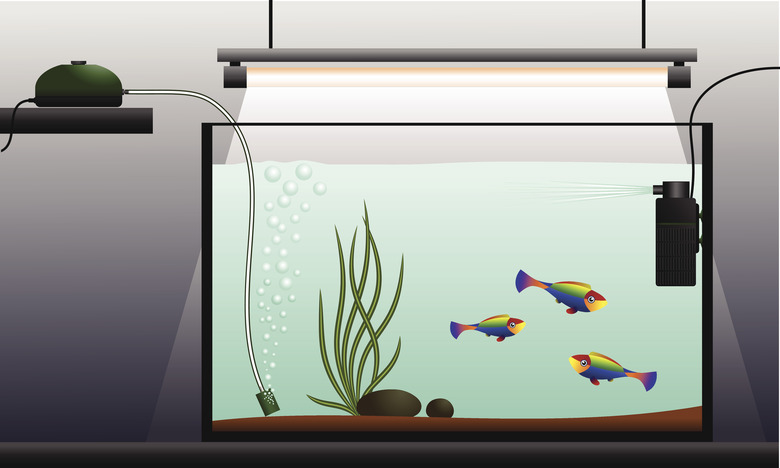
B.) Aquarium Set-Up (Labeled)
A.) Making the Connection (Aquarium → Natural Habitat)
Cold Water |
|---|
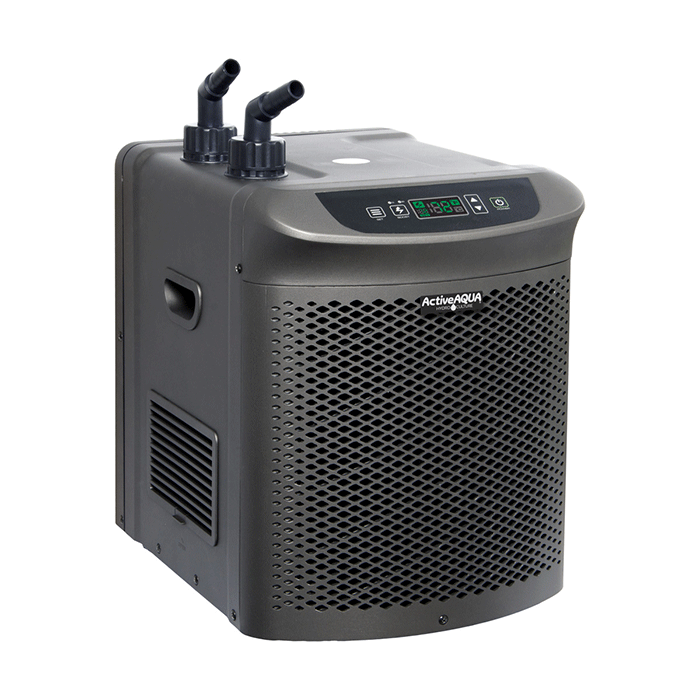
Aquarium: Chiller | Natural Habitat |
The chiller maintains optimal water temperature for the trout | Shade trees, snowmelt, underground water sources (springs) help keep water cold. |
| 
|
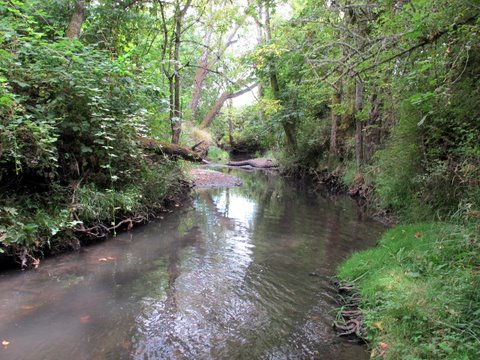
Oxygenated Water |
|---|
Aquarium: Air Pump/Air Stone | Natural Habitat |
|---|
The air pump and airstone oxygenate your water. The filter output also adds circulation to the aquarium. | Water passing over rocks and waterfalls adds oxygen to a stream. Aquatic plants also help produce oxygen. Cold water also helps add more oxygen. |
|---|

| 
|
|---|
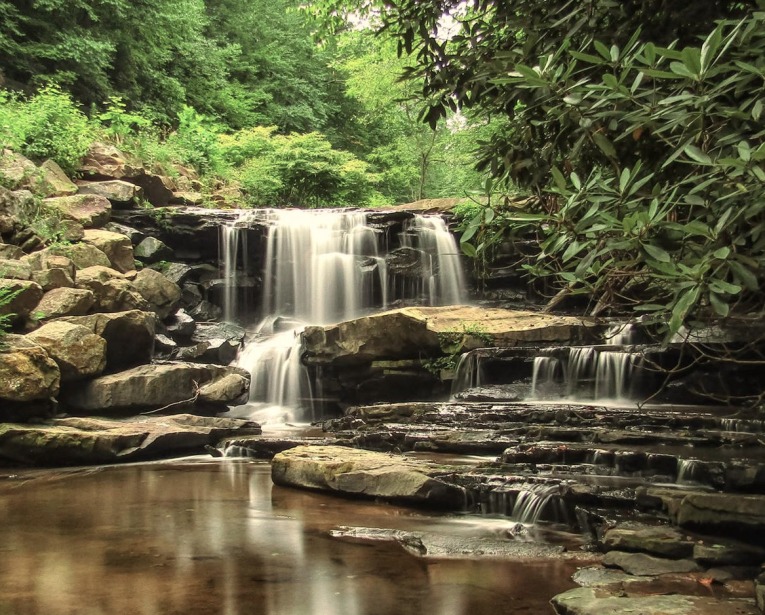
Clean Water |
|---|
Aquarium: Filter Unit | Natural Habitat |
The filter unit helps break down trout waste into microorganisms that help the water stay clean. The filter outflow nozzle pushes out water, the circulation also helps keep the water clean. | Natural filtration, sedimentation and aquatic plants work together in a natural stream to keep it clean. Bacteria and scavengers that eat decaying matter clean the water, and plants absorb the nitrates. Water flow also helps oxygenate the stream and keep pollutants from building up. |

| 
|
B.) Aquarium Set Up (Labeled)
2.) Common Equipment Problems
Filter Unit |
QUESTIONWhat do I do if the Black FLUVAL filter cannister is making a loud/rattling noise or is hot to the touch? |
SOLUTIONSThis is an indication that water is not moving through the filter pump properly. Locate the filter outflow nozzle just beneath the surface of the water in your tank. It is attached to black, ribbed tubing coming from the filter canister. Check to see if water is flowing out by putting your finger in front of it.

If water is NOT flowing: Unplug your filter and let it cool down for 15 minutes. Check to make sure that any screening over your outflow nozzle is clear of debris. Remove it and rinse off as needed. (Once trout are large enough, these can be permanently removed.) Check the water intake for the filter (at the end of the long plastic tube going to the bottom of your tank). If there is screening around the intake, make sure it is free of debris. Remove it, rinse off and replace. (All parts of the intake cage can be removed and replaced by hand. You won't break it!) After 15 minutes, restart your filter. First, locate the gray/red gently manual pump handle on the top of the filter canister. Pump it up and down several times. Water should flow out of the outflow nozzle when you pump. Plug in the filter, and evaluate. A few extra manual pump strokes may be necessary.

If filter is still rattling, or not pumping water, you have a broken impeller or impeller shaft. This is an easy fix. If you have extra parts provided, you can replace yourself, or call us for a trouble-shooting visit. Leave the filter unplugged.
If water is flowing: Follow the steps above. If problem continues, call DCL. |
QUESTIONWhy is my FLUVAL Filter cannister making a hissing/sighing noise on and off? |
SOLUTIONSThis means you have a worn gasket. Another easy fix! The gasket is a rubber band that fits around the motor housing, and seals the filter when you close up the canister. It needs to be removed, cleaned and lubricated with oil.

|
Chiller |
QUESTION My chiller is not functioning properly, what could be wrong? |
SOLUTIONSFor a variety of potential malfunctions, the first thing to do is to power down the unit (unplug or switch off) and wait 10 seconds before restarting. This reset may do the trick; if not, call us. (Your aquarium will not warm to dangerous temperatures for quite some time.) |
QUESTIONMy chiller is on, but water in tank is not getting cold enough, what could be happening? |
SOLUTIONSThe chiller's "Pre-filter" may be clogged. This is a black foam cylinder attached to the submersible pump in your aquarium. If it has a lot of debris stuck to it, or appears to be squeezed together, it needs cleaning.
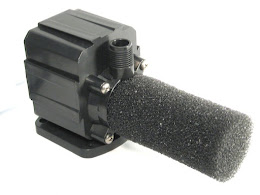
1. Follow the black cord from the submersible pump to the power supply and unplug it.
2. Pull the whole unit toward the surface, slide the foam filter cylinder off its frame and rinse it out.
3. Replace the clean foam filter, PLUG THE PUMP IN.
4. You should notice an immediate increase in water flow through the chiller system. Your aquarium should begin to cool over the next 15-20 minutes. |
Air Pump |
QUESTIONHow come my blue air pump is buzzing but there are no bubbles coming from the airstone at the bottom of the aquarium? |
SOLUTIONSTo address noise, shift the pump away from any other surfaces. Also make sure that the rubber feet on the bottom of the pump are in place. If no bubbles are rising from the airstone, follow the clear airline from the airstone to the blue air pump. Make sure all connections are in place. Occasionally, they can be pulled apart, and can be easily reconnected by hand. If neither of these options helps, unplug the airpump and call DCL. Your fish will be fine for several days.
|
3) Tank Maintenance Tips
A.) Understanding Your Aquarium's Nitrogen Cycle
B.) What to Expect: Aquarium Cycle Stages
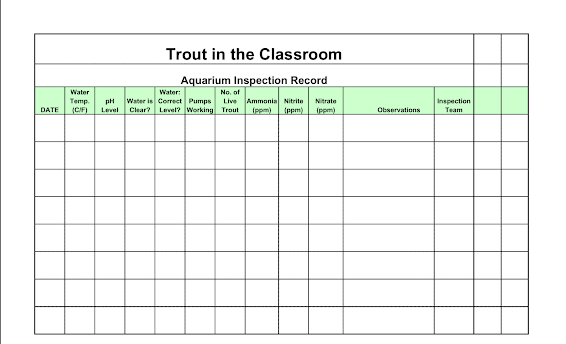
C.) Water Testing & Recording Data
D.) Troubleshooting Water Quality Issues
E.) Water Changes
A.) Understanding Your Aquarium’s Nitrogen Cycle
The Nitrogen Cycle begins in your aquarium when you start feeding your fish and they produce waste (leftover fish food, poop, dead fish particles). The Nitrogen Cycle is an essential process that converts tank waste into safe and beneficial bacteria colonies. Add the recommended beneficial bacteria once a week to help the Nitrogen Cycle work.
> How it Works:
Fish waste is converted to ammonia and nitrite (which are toxic to your trout) into a relatively harmless nitrogen compound- nitrates. In nature, plants would absorb the nitrate and use it as nutrients, but without the presence of plants in our tank, regular water changes help reduce nitrate levels.
B.) What to Expect: Aquarium Cycle Stages
Stage 1: Ammonia Spike/ Begin Adding Bacteria Blend |
|---|
When: Fry/Parr Stage (swim-up stage), when trout begin to eat and create waste. |
Trout Stress: Some trout deaths due to ammonia spike and some trout not learning to eat food. |
What happens: Ammonia levels will increase and stay elevated for about 2 weeks, until stage 2 happens. |
Explanation: Your aquarium nitrogen cycle begins as your trout begin eating food and excreting waste. Uneaten food, fish poop, and dead fish break down to form ammonia. |
What Should I Be Doing? Add a weekly recommended dose of Microbe-Lift Bacteria Blend to assist with aquarium cycling. Remove any dead fish from the tank, remove netting from hose nozzles to rinse out, then put the netting back on. Begin Water Chemistry Testing habits in your classroom so this information can be tracked at least weekly. Record all observations on your Aquarium Inspection Record. Have students bring in gallon jugs. Fill these jugs and allow the water from your tap to age. In the event you need to do a water change, you should have 8 gallons (or about 20% of your aquarium volume) ready to go!
|
Stage 2: Ammonia Decrease & Nitrite Spike |
When: Fry/Parr Stage- Trout swimming, eating, producing waste. |
Trout Stress: There will be another trout die-off due to a nitrite spike. |
What happens: Ammonia levels will begin to decrease and nitrite levels will increase. Nitrites will remain high for about 2 weeks, until stage 3 happens. |
Explanation: Bacteria called “nitrosomonas” grow in the filter and then convert the ammonia to toxic nitrite. High nitrite levels mean the “nitrobacters” are still trying to establish in your aquarium. |
What Should I Be Doing? |
Stage 3: Nitrite Decreases & Nitrate Spike |
When: Usually about 5-8 weeks after your trout have hatched |
Trout Stress: There should be very few if any die-offs at this time, as the toxic nitrite is being converted to the less-toxic nitrates. |
What happens: Nitrite levels begin to decrease and nitrate levels increase |
Explanation: Nitrobacters convert the toxic nitrites to less toxic nitrates. Once your aquarium reaches this point it is said to have “cycled”. |
What Should I Be Doing? Start regular water changes (20% or 8 gallons.) In a natural stream, nitrates would be absorbed by plants and used as nutrients. There is no place for nitrates to go in your aquarium, which is okay since they are not toxic, but could lead to murky water and algae growth. Removing 20% of the aquarium’s water on a regular basis (weekly or bi-weekly) will help keep the water healthy. Continuously replace 8 gallons of tap water to age (at least 2-3 days of aging for tap water) Keep adding bacteria blend Keep removing dead fish and food waste, vacuum gravel as needed Keep up water testing and recording data
|
C.) Water Testing & Recording Data
Water chemistry tests help us to assess the presence of beneficial bacteria in your aquarium. This also helps us monitor whether the water chemistry levels are at a healthy place for fish survival.
Every school has a water test kit with a Water Testing Instructional Guide that includes recommended levels and troubleshooting strategies. Schools should also have a packet hanging from the side of their aquarium which includes an Aquarium Inspection Record for recording water chemistry results.
--- Interpreting Data ---
> Recommended Levels:
Ammonia- Less than 1 mg/l (ppm).
Nitrite- Near zero (ppm), once bacteria are established in the filter system
Nitrate- Below 40 ppm (mg/l)
pH- the pH scale runs from 1 (acid) to 14 (basic). 7 is "neutral". A pH of 7.4 – 8.4 is fine for our trout
--- Recording Data ---
> Why record data?
Not only do we want to regularly take water tests, but we want to record that information somewhere where we can see it. That way, we can see the nitrogen cycle at work, and we can troubleshoot if the aquarium water is not cycling as it should, for example: nitrite levels remain high for more than a couple weeks. Collecting this information helps us to understand how to better take care of our trout’s habitat and possibly stop problems before they become any worse.
> Where to record data?
You can take this process a step further by inputting this data on the online Aquarium Monitoring Record sheet, so the DCL team has access to this information and can help you troubleshoot any issues that may occur. D.) Troubleshooting Water Quality Issues
(Under Construction....)
E.) Water Changes
After your aquarium water has cycled, the best and only way to reduce NITRATE levels is to do a water change.
How to do a Water Change |
FIND A GOOD WATER SOURCE |
Well water is a good choice, if you can get to it before any disinfection or softening treatment Otherwise, use tap water and plaN to age it for at least three days in open containers to allow chlorine to dissipate. (Water condition can be used but isn't generally needed.) DO NOT use stream water. It will come with its own live biology, which isn't bad, but can introduce a host of complications to keeping your aquarium stable.
|
PLAN TO CHANGE ABOUT ⅓ OF YOUR AQUARIUM WATER AT A TIME (ABOUT 10-15 GALLONS) |
If you are changing water for the first time, in response to high nitrate (or other) levels, anticipate needing to do two changes before improvements are measurable. Hardware store 5-gallon buckets or gallon jugs all work fine. (Clean, square cat litter buckets are actually ideal, and actually fit perfectly into an aquarium.)
|
PROCEDURE |
First, make sure you know how much water you have available to add to the tank. Use a large container (or siphon) to remove that amount of water from the aquarium. Keep the final container on hand. Add your fresh water. Top off with that old tank water you've saved if needed.
|
4.) Instructional Videos & Resources
Ammonia Test:
Water Testing Links & Materials
External Trout In The Classroom Help Pages:
5) End-of Year Clean Up
At the end of the year, it is important to clean your aquarium to ensure a successful next year. Your equipment will also have a much longer life. Here are a few pointers:Aquarium Tank- Then turn off the electrical pumps, chillers, filters, etc. Disconnect tubing.
- Empty the tank almost all the way, by your usual method--many people like to use the electric pump to do this work. Be careful not to suck gravel into the pump, however!
- Wipe down the inside of the tank and equipment surfaces with white vinegar and a sponge. Use a scrubby and repeated applications to soften and remove calcium carbonate and algae.
- IF DISINFECTION IS NECESSARY: Using a solution of 1 part Chlorine bleach (Clorox) and 10 parts water, wipe down the interior and exterior of the tank. Use the 1:10 bleach solution for cleaning out the tubing and all parts exposed to water - soak parts in bleach solution right in the tank. (Clean tubes using long brushes you can buy at any pet shop- we can reimburse for costs if needed). CAUTION- DO NOT USE VINEGAR AND BLEACH TOGETHER - THIS CAN BE TOXIC!
- Wipe dry with clean cloth, or let air-dry.
- If you have any pebbles or gravel in the tank, they should be removed, washed, and dried by laying out on a cloth or towel in the sun or a ventilated area. They can also be sterilized with the Clorox solution, but they also MUST be completely dried.
Aquarium Chiller- Rinse pre-filter sponge on pump thoroughly with water, and let air-dry.
- Tip chiller and drain. Using pump or faucet hose, flush chiller with clean tap water to ensure any dirt is washed out of the cooling tank.
- Remove dust and lint from all vents on the chiller, with cloth or soft bristle brush.
Filter- Disconnect tubing from filter canister by releasing the AquaStop Valve. Rinse/clean tubing as appropriate.
- Remove the top section of the filter canister (as demonstrated), pour out the water and remove contents (best to do this in a sink or tub- they will be a bit gunky)
- Thoroughly rinse out all filter cartridges (filter sponges, charcoal, etc.) with regular water, and dry them in the sun or a well ventilated area. For most filters, it is suggested that you buy new filter cartridges for the following year. You can also use this year’s filters that you rinsed out.
- Rinse and wipe out the plastic parts with vinegar OR your 1:10 bleach solution. Thoroughly air-dry entire filter apparatus.
Air pump, thermometers and other materials: Disassemble and clean as with other parts, store in boxes and/or in the aquarium.
Storage: We will retrieve and store materials as needed- however, if you expect to continue with the program in coming year, it is easiest to keep it on site at your school. No particular storage requirements, but try and keep your set-up in a safe, dry location. DON'T Forget to complete your end of the year survey!! 6) MSDS PDF's
Materials Data Safety Sheets (MSDS's) for each of the aquarium additives used in this program can be found and downloaded from the website of Aquarium Pharmaceutical Products (API). The chemicals selected for this program have been evaluated in terms of classroom safety, and are found to pose no sigificant health threat, when stored and used properly. Specific PDF downloads can be found as follows:
___________________


.png)